This post contains affiliate links. As an Amazon Associate, I earn from qualifying purchases at no extra cost to you.
The first time I made this roasted carrot white bean dip recipe, I almost didn’t serve it. It looked a little too humble sitting next to the spinach artichoke dip and the seven-layer. However, I put it out anyway — mostly because I needed to fill a gap on the table. Within twenty minutes, it was completely gone. Three people asked me for the recipe before they even grabbed a second plate of food.
That was about six years ago, at my neighbor’s retirement party. I had roasted a sheet pan of carrots for dinner the night before and had a half-used can of white beans in the fridge. Desperation dip, honestly. But something about the caramelized sweetness of those carrots blended with the creamy, neutral base of the beans just clicked. I tweaked it a few times over the following months, and now it’s one of the most-requested recipes I make.
I’ve brought this to tailgates, book clubs, baby showers, and Christmas Eve parties. My brother-in-law — a dedicated carnivore who once described hummus as “sad food” — now requests this specifically. That, more than anything, tells you what you need to know.
Why This Roasted Carrot White Bean Dip Recipe Works
- Roasting, not steaming, is non-negotiable. Roasting at high heat concentrates the natural sugars in the carrots and creates caramelized edges. Steamed carrots give you a watery, flat dip. Roasted carrots give you depth, sweetness, and that unmistakable golden flavor that makes people ask “what IS that?”
- White beans provide creaminess without dairy. Cannellini beans specifically have a mild, buttery flavor and a high starch content that blends into a silky base. They don’t compete with the carrot — they amplify it. In my experience, chickpeas work as a substitute, but the texture is denser and less smooth.
- Warm spices bridge the sweet and savory gap. Cumin, smoked paprika, and a pinch of cinnamon sound unconventional. That said, they’re exactly what makes this dip interesting without being polarizing. The cinnamon especially enhances the sweetness of the carrot without making the dip taste like dessert.
- Lemon juice at the end, not the beginning. Adding citrus before blending mutes it. Specifically, I stir in fresh lemon juice after everything is fully blended and taste from there. It brightens the entire dip without turning it acidic.
What You’ll Need
These quantities make a generous party-sized batch. For a smaller crowd, the recipe halves easily.
Prep time: 10 minutes | Cook time: 30 minutes | Total time: 40 minutes | Servings: 10–12 as an appetizer
- 1½ lbs (about 6–8 medium) carrots, peeled and cut into 1-inch pieces
- 2 cans (15 oz each) cannellini beans, drained and rinsed
- 4 cloves garlic, unpeeled (roasted alongside the carrots)
- 3 tablespoons olive oil, divided (2 for roasting, 1 for blending)
- 1 teaspoon ground cumin
- ¾ teaspoon smoked paprika
- ¼ teaspoon ground cinnamon
- ½ teaspoon kosher salt (plus more to taste)
- ¼ teaspoon black pepper
- 2–3 tablespoons fresh lemon juice (start with 2, adjust at the end)
- 2–3 tablespoons water or reserved bean liquid, for consistency
- 2 tablespoons tahini (optional but highly recommended)
For serving: A drizzle of good olive oil, a pinch of smoked paprika, and fresh herbs like parsley or chives.
Substitutions: No cannellini beans? Great Northern beans work well. Tahini-free version is still delicious — just slightly less nutty. Baby carrots roast fine if that’s what you have.
How to Make It: Step by Step
Step 1: Preheat and Prep Your Pan
Preheat your oven to 425°F. This temperature is intentional — it’s hot enough to caramelize the carrots without burning them before they’re tender inside. Lower temperatures (say, 375°F) will steam the carrots more than roast them, and you lose that crucial caramelization.
Line your baking sheet with parchment or leave it bare if it’s nonstick. Spread the carrot pieces in a single layer. This is critical — crowded carrots steam. You want space between each piece so moisture can escape. Meanwhile, tuck the unpeeled garlic cloves among the carrots. They’ll roast gently inside their skins and turn sweet and jammy.
Step 2: Season and Roast
Drizzle 2 tablespoons of olive oil over the carrots. Sprinkle on the cumin, smoked paprika, cinnamon, salt, and pepper. Toss everything together directly on the pan. Every carrot piece should have color on it from the spices.
Roast for 25–30 minutes, flipping the carrots once at the halfway mark. You’re looking for deep golden-orange edges and a fork-tender center. Some pieces will have dark caramelized spots — that’s exactly what you want. Don’t pull them too early. I learned this the hard way: underdone carrots blend gritty, not smooth. If the edges look golden but a fork doesn’t glide through easily, give them five more minutes.
The smell cue is powerful here. When the kitchen starts smelling like sweet, toasty spice, they’re getting close. Pull the pan when the carrots are tender, fragrant, and have visible caramelization along the edges.
Step 3: Cool Slightly, Then Peel the Garlic
Let the carrots rest for about 5 minutes before blending. Extremely hot vegetables can create steam pressure in a blender, which is both a mess and a safety issue. Meanwhile, squeeze the roasted garlic out of their skins directly into the food processor. Roasted garlic is much mellower than raw — sweet, nutty, and deep. Don’t skip this step or substitute raw garlic. Raw garlic will make the dip sharp and harsh.
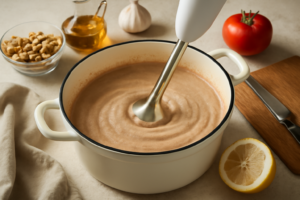
Step 4: Blend to a Smooth, Creamy Dip
Add the roasted carrots, squeezed garlic, drained cannellini beans, tahini (if using), and remaining tablespoon of olive oil to a food processor. Blend for about 60 seconds. Stop and scrape down the sides.
The dip will look rough and chunky at first — that’s normal. As a result, patience here matters. Keep blending and add your reserved bean liquid or water one tablespoon at a time until the texture becomes smooth and creamy. Total blending time is usually 2–3 minutes with scraping. You’re aiming for a texture similar to thick hummus — spreadable but not runny.
A common mistake: adding too much liquid too fast. Add it slowly, blend, and check. You can always thin a dip further, but you can’t thicken it easily once it’s too loose.
Step 5: Season and Finish
Now stir in the lemon juice. Taste and adjust salt, pepper, and lemon. This is where you make the dip yours. For example, if it tastes flat, it usually needs more salt. If it tastes one-dimensional, it needs more lemon. If the spice feels muted, a pinch more smoked paprika added to the top when serving makes a big difference visually and flavor-wise.
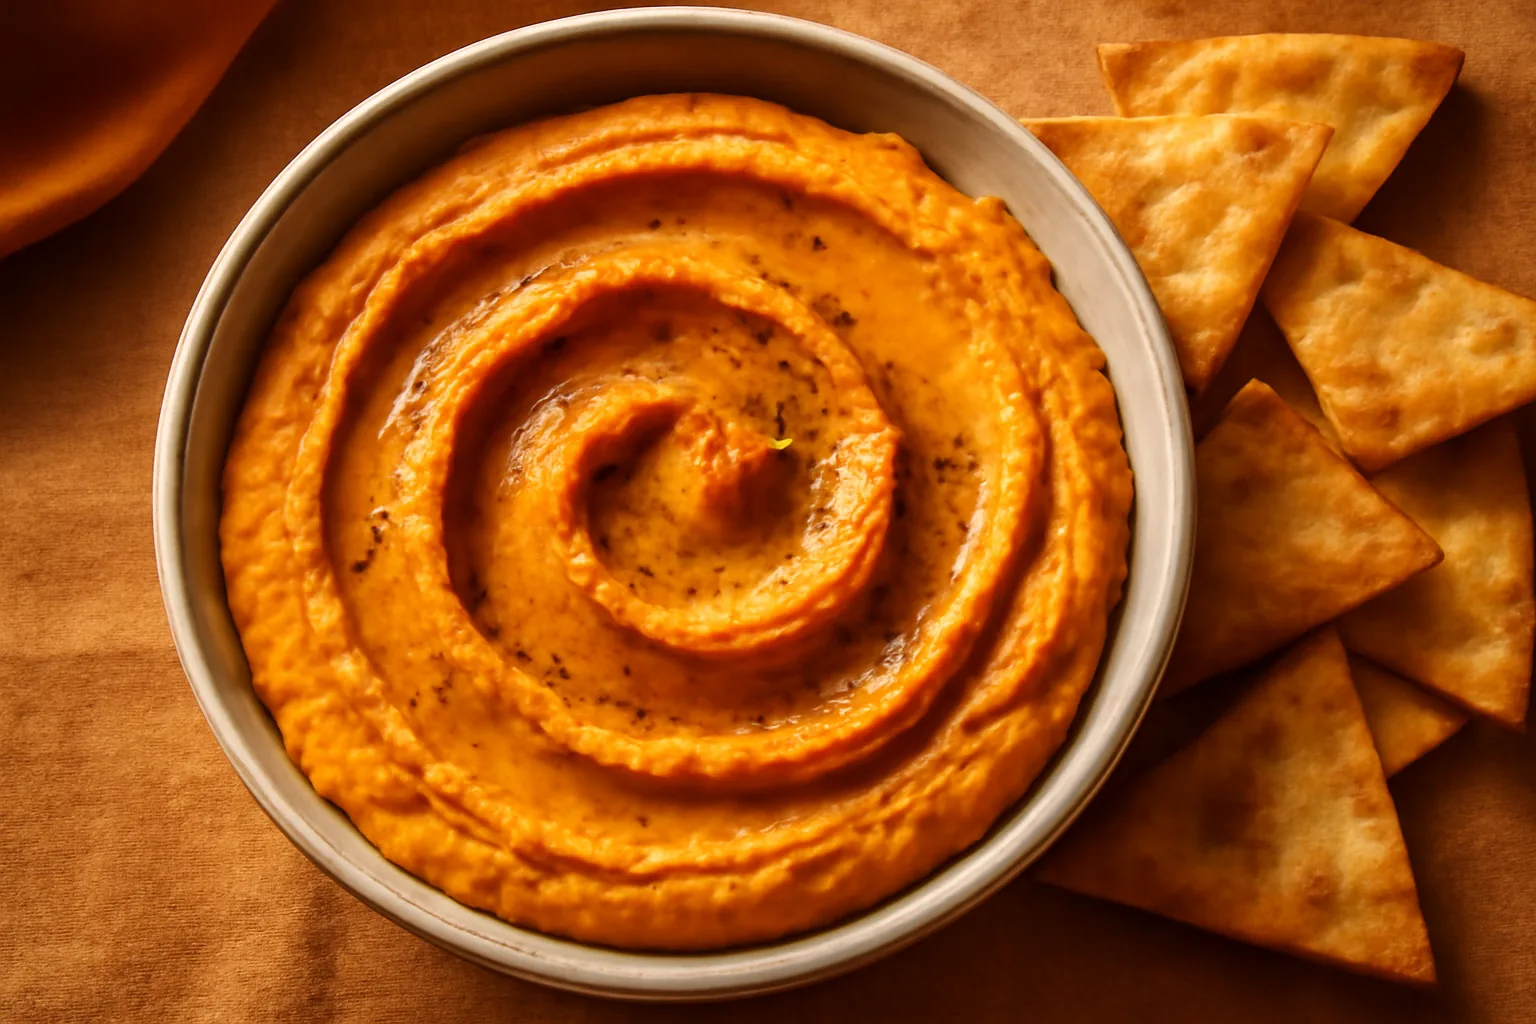
Transfer to your serving bowl. Drizzle olive oil on top, dust with smoked paprika, and scatter fresh herbs. Serve warm or at room temperature.
Preparation Tips From 100+ Batches
- Make it ahead: This dip is genuinely better the next day. The flavors meld and deepen overnight. Make it up to 3 days in advance and store covered in the fridge. Let it sit at room temperature for 20–30 minutes before serving.
- Storage: Keeps well in an airtight container in the fridge for up to 5 days. The color may deepen slightly — that’s normal and doesn’t affect flavor.
- Freezing: Yes, this freezes. Portion into freezer-safe containers and freeze for up to 2 months. Thaw overnight in the fridge and stir well before serving. The texture may need a quick re-blend after thawing.
- Scaling up for crowds: I’ve doubled this recipe many times for large parties. However, when doubling, you’ll likely need two sheet pans. Don’t pile everything onto one pan — the carrots will steam, not roast, and the flavor suffers dramatically.
- Seasonal variation — fall/winter: Add ¼ teaspoon of ground ginger and swap smoked paprika for regular sweet paprika. The ginger adds warmth that feels especially cozy in cold months.
- Serving it warm: If you want to serve it warm (great for fall gatherings), reheat gently in a small saucepan over low heat, stirring frequently and adding a splash of water if needed to loosen it up.
What to Serve With It
The flavor profile here is warm, earthy, and slightly sweet. In my experience, you want dippers that either complement those notes or offer a contrasting crunch or saltiness.
Best Dippers for This Dip
- Pita chips or warm pita bread — The classic pairing. Toasted pita adds a nutty crunch that plays beautifully off the creamy dip.
- Sliced cucumber and celery — Cool, crisp, and refreshing. These cut through the richness perfectly.
- Sourdough crostini — For a more elevated appetizer spread, thin sourdough crostini are excellent. The slight tang of sourdough is a great counterpoint to the sweet carrots.
- Seed crackers or multigrain crackers — Something like Mary’s Gone Crackers adds texture and a wholesome, nutty flavor that pairs naturally here.
- Roasted or raw broccoli florets — Unexpected but genuinely excellent. The slight bitterness of broccoli against the sweetness of carrot is a combination I now serve intentionally.
- Naan or flatbread — Especially warmed. Perfect for a cozy dinner party setting where people are standing around the kitchen.
On the other hand, avoid very salty, heavily seasoned chips. They tend to compete with the spice blend in the dip rather than complement it. Plain or lightly salted options let the roasted carrot flavor stay front and center.
The Gear That Makes It Better
I’ve ruined batches of this dip on bad baking sheets. That’s not hyperbole. Thin, warped, or flimsy pans create hot spots that burn some carrot pieces while leaving others underdone. Uneven roasting means uneven flavor in the final dip.
After years of testing, the baking sheet matters more than most people think. Specifically, I want a pan that distributes heat evenly, handles high oven temperatures without warping, and has enough surface area to spread carrots in a single layer without crowding.
The pan I reach for now is the GoodCook Everyday Nonstick Baking Sheet Set. It’s a 3-pack that includes small (13×9), medium (15×10), and large (17×11) pans, all made from carbon steel. For this recipe, I use the large pan for a full batch — the 17×11 surface area is exactly what you need to keep carrots spread out and actually roasting rather than steaming.
The carbon steel construction holds and distributes heat remarkably evenly. As a result, every carrot piece gets those caramelized edges, not just the ones sitting directly over the oven’s heating element. The nonstick surface also means the caramelized bits — which carry enormous flavor — release cleanly rather than sticking and burning. I’ve used this set for everything from roasting vegetables to baking cookies, and it’s held up through hundreds of uses without warping at high heat.
If