This post contains affiliate links. As an Amazon Associate, I earn from qualifying purchases at no extra cost to you.
The Dip That Made My Brother-in-Law Ask for the Recipe Twice
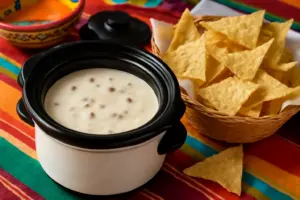
It was Super Bowl Sunday, three years ago. My brother-in-law Marcus is the guy who brings a full charcuterie board to every party and has opinions about cheese. Strong opinions. So when I set out a warm, golden, gloriously drippy queso and he scooped chip after chip without stopping, I let him go for a solid ten minutes before saying anything. Then I told him. No dairy. Not a drop. His face was genuinely confused. That moment is exactly why this cashew queso dairy free recipe has never left my party rotation.
I had been testing cashew-based dips for about two years at that point. Most versions were fine — creamy, mild, passable. However, none of them had the warmth, the slight funk, or the oozy pull that makes queso queso. I went through probably thirty variations before I landed on this combination of soaked cashews, roasted poblano, nutritional yeast, and a very specific ratio of tapioca starch. That last ingredient is the magic trick. It gives the dip that stretchy, melty texture that makes people genuinely stop mid-conversation.
Since that Super Bowl, I’ve made this dip for my sister-in-law’s baby shower, two work potlucks, a birthday tailgate, and more Friday nights than I can count. Every single time, at least one person asks me which brand of Velveeta I used. That question never gets old.
Why This Cashew Queso Dairy Free Recipe Actually Works
- Soaking time is non-negotiable. Raw cashews soaked for at least four hours — or overnight — break down enough to blend completely smooth. Skip this step and you get grainy dip. I learned this the hard way at a potluck in 2021 when I only had 30 minutes to soak them in hot water. The texture was gritty enough that I knew, even if no one else did.
- Tapioca starch creates the melt. This is the ingredient most cashew queso recipes leave out. Specifically, it activates when heated and gives the dip a stretchy, coating consistency instead of a flat, hummus-like texture. Without it, the dip is good. With it, the dip is convincing.
- Nutritional yeast builds the cheese flavor. On its own, nutritional yeast can taste a little flat. However, combined with apple cider vinegar, smoked paprika, and a small hit of miso paste, it layers into something genuinely savory and complex. The miso is my secret weapon — just one teaspoon adds a fermented depth that mimics aged cheese.
- Roasting your aromatics first matters. Raw blended onion and garlic taste sharp and aggressive. Roasting them — or even just sautéing them with a little salt before blending — rounds out the flavor dramatically. This extra ten minutes transforms the finished dip from “interesting” to “I need this recipe.”
What You’ll Need
Prep Time: 15 minutes (plus 4 hours soaking) | Cook Time: 10 minutes | Total Time: 25 minutes active | Servings: 8–10 as an appetizer
- 1½ cups raw cashews, soaked 4–8 hours and drained
- ¾ cup vegetable broth (plus more for thinning)
- ¼ cup water
- 3 tablespoons nutritional yeast
- 1½ tablespoons tapioca starch (also sold as tapioca flour)
- 1 teaspoon white miso paste
- 1 tablespoon apple cider vinegar
- 1 teaspoon smoked paprika
- ½ teaspoon ground cumin
- ½ teaspoon garlic powder
- ¼ teaspoon turmeric (for color)
- ½ teaspoon fine sea salt, plus more to taste
- ¼ teaspoon cayenne pepper (optional, adjust for heat)
- 1 poblano pepper, roasted, peeled, and roughly chopped
- ½ small yellow onion, roughly chopped and sautéed
- 2 cloves garlic, sautéed with the onion
- 1 tablespoon olive oil (for sautéing)
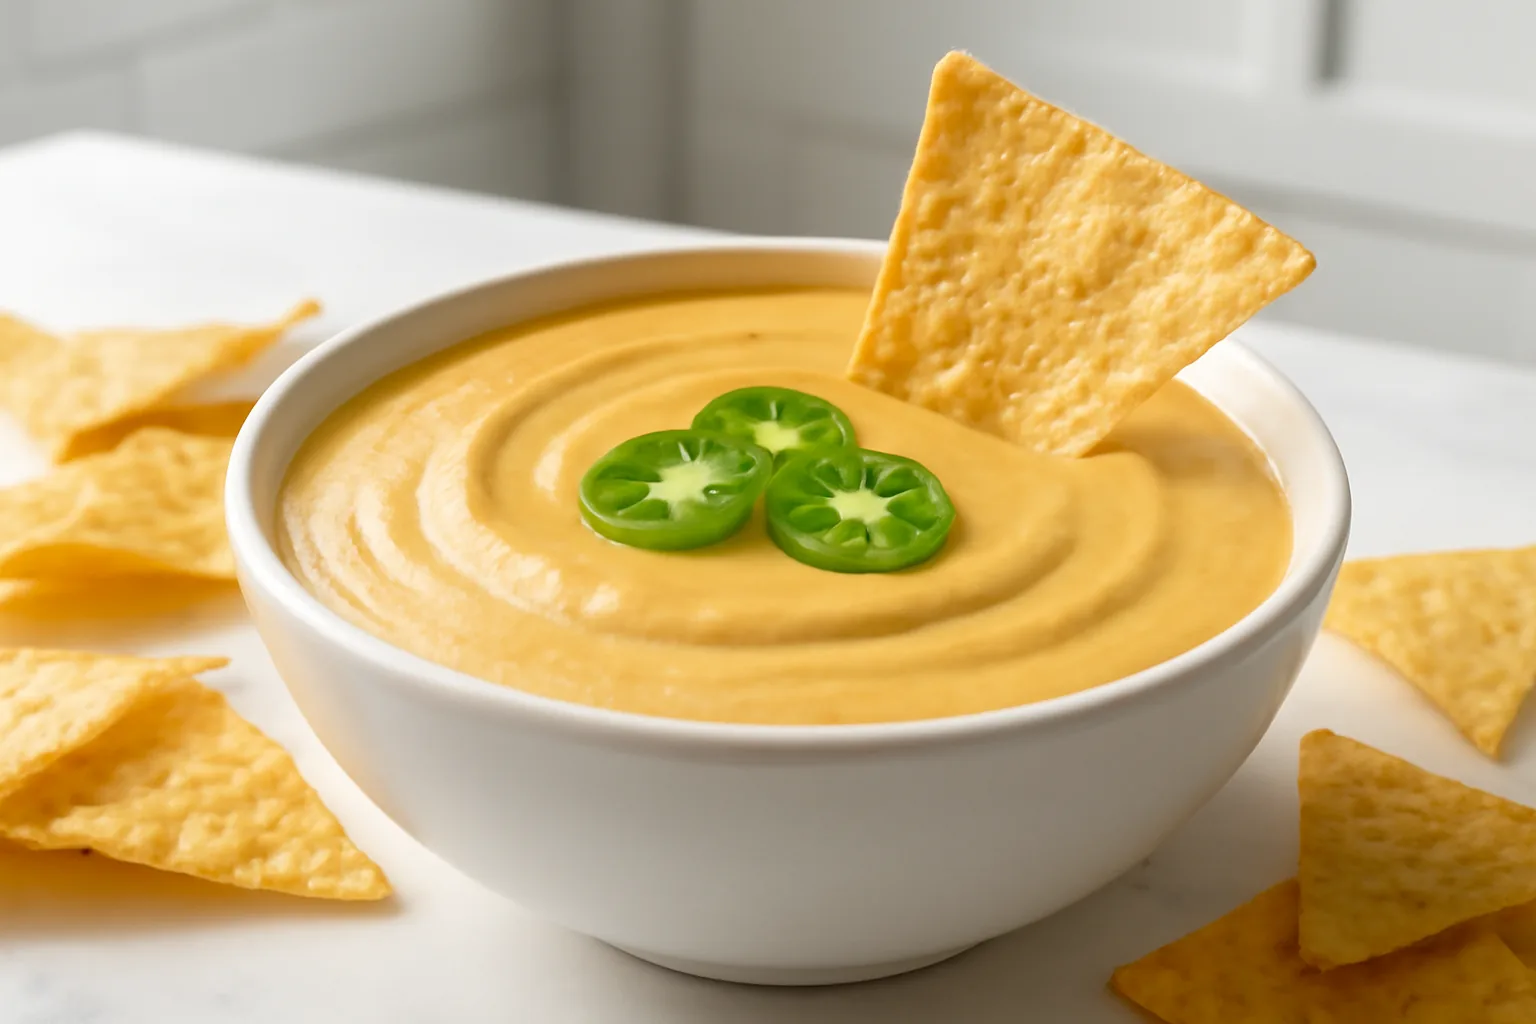
- Optional garnishes: pickled jalapeños, fresh cilantro, diced tomato, smoked paprika dusted on top
Substitutions: No poblano on hand? A roasted red bell pepper works beautifully and keeps the heat level mild. Tapioca starch can be swapped for arrowroot starch at the same ratio. White miso can be replaced with a ½ teaspoon of soy sauce in a pinch, though the depth won’t be quite as complex.
How to Make It: Step by Step
Step 1: Soak Your Cashews
Place raw cashews in a bowl. Cover with cold water by at least two inches. Soak for a minimum of four hours — overnight is better. When ready, they should feel soft when pressed between your fingers and have swelled noticeably in size. Drain and rinse thoroughly under cold water before using.
Common mistake to avoid: The hot-water shortcut (boiling water for 30 minutes) technically softens cashews, but the texture never blends as silky-smooth. For a dip you’re serving to guests, give yourself the time.
Step 2: Roast the Poblano
Place your poblano directly over a gas burner flame or under a broiler set to high. Char the skin on all sides, turning with tongs every 2–3 minutes. The pepper should be fully blackened and blistered all over — this takes about 8–10 minutes total. Transfer it immediately to a sealed zip-lock bag or a covered bowl. Let it steam for 10 minutes. Then peel away the charred skin under running water, remove the seeds, and roughly chop.
Visual cue: Don’t be shy about the char. A lightly blistered poblano won’t have enough smokiness. You want it aggressively blackened.
Step 3: Sauté the Onion and Garlic
Heat olive oil in a small skillet over medium heat. Add the chopped onion with a pinch of salt. Cook, stirring occasionally, for 5–6 minutes until soft and just starting to turn golden at the edges. Add garlic and cook for another 60–90 seconds until fragrant. Remove from heat. The salt here is intentional — it draws moisture out of the onion and speeds up softening, which means sweeter flavor and no harsh raw-onion bite in the finished dip.
Step 4: Blend Until Completely Smooth
Add drained cashews, vegetable broth, water, nutritional yeast, tapioca starch, miso paste, apple cider vinegar, smoked paprika, cumin, garlic powder, turmeric, salt, cayenne, roasted poblano, and sautéed onion and garlic to your blender. Blend on high for 60–90 seconds. Stop and scrape the sides once at the 30-second mark. The mixture should look completely smooth, pale golden-orange, and slightly thick — like a thin batter.
Common mistake to avoid: Under-blending. The mixture will look smooth before it actually is. Give it the full 90 seconds on high speed. If you have a high-powered blender, you’ll feel and hear the consistency shift — it gets quieter and almost silky-sounding as it finishes.
Step 5: Heat and Thicken on the Stovetop
Pour the blended mixture into a medium saucepan over medium heat. Whisk constantly as it heats. In about 4–6 minutes, you’ll notice it beginning to thicken. Keep whisking. As the tapioca starch activates, the dip will suddenly pull together — it becomes glossy, slightly stretchy, and coats the whisk in a thick layer. That’s your moment. Remove from heat immediately.
Visual cue: The finished dip should hold a line briefly when you drag a spoon through it. Taste and adjust salt and cayenne now, while it’s hot. If it’s too thick, whisk in vegetable broth one tablespoon at a time.
Preparation Tips From 100+ Batches
- Make it ahead: This dip stores beautifully. Make it up to three days in advance and refrigerate in an airtight container. It will firm up significantly when cold — that’s normal.
- Reheating: Reheat gently in a saucepan over low-medium heat, whisking in a splash of vegetable broth to loosen it back to dipping consistency. A slow cooker set to “warm” also works perfectly for parties — it stays smooth and dippable for hours.
- Scaling up for crowds: This recipe doubles and triples easily. For a party of 20+, I make a triple batch. In my experience, people always take more than you expect — especially once word gets around that it’s dairy-free.
- Seasonal variation — fall version: Stir in 3 tablespoons of roasted butternut squash purée after blending. It adds a subtle sweetness and deepens the color beautifully. That said, keep the tapioca starch ratio the same — the squash adds moisture.
- Spicy verde variation: Swap the poblano for two roasted tomatillos and one serrano pepper. Add a handful of fresh cilantro to the blender. The result is a green queso that is absolutely stunning on a party table.
- Freezing: Technically possible, but the texture can become slightly grainy after thawing. For best results, keep it refrigerated and use within four days rather than freezing.
What to Serve With It
The classic move is tortilla chips, and for good reason. Specifically, I reach for thick, restaurant-style chips — Tostitos Cantina or Xochitl — because they hold up to a generous scoop without snapping. Thin chips just don’t do this dip justice.
Beyond chips, here’s what works beautifully:
- Warm soft pretzel bites — The salt on the outside plays perfectly against the smoky queso.
- Sliced baguette or sourdough — Great for a more elevated appetizer spread.
- Blanched broccoli and cauliflower florets — Surprisingly wonderful, and a good option for guests watching carbs.
- Bell pepper strips — Red and orange peppers add a sweet crunch that balances the savory dip.
- Roasted fingerling potatoes — Serve this as a loaded dip situation at a dinner party. People lose their minds over it.
- Drizzled over nachos or tacos — On nights when I’m not hosting, I use leftovers exactly like this.
For garnishes on the dip itself, I always keep it simple: a few pickled jalapeño slices, a small handful of fresh cilantro leaves, and a light dusting of smoked paprika right before serving. It makes the presentation look intentional without any real effort.
The Gear That Makes It Better
I’ll be honest with you: I wasted years fighting mediocre blenders on this dip. Standard countertop blenders leave tiny cashew fragments suspended in the mixture no matter how long you run them. The result looks smooth but has a faint grittiness on the palate. For a party dip meant to fool people into thinking it’s dairy, that texture gap is the difference between convincing and almost.
The blender I use now — and the one I genuinely recommend for anyone serious about cashew-based dips — is the Vitamix VX1 Professional-Grade Blender. The stainless steel blades and high-torque motor break down soaked cashews to an almost liquid smoothness in under 90 seconds. No straining required. The 10-speed control also lets me start slow to incorporate everything, then ramp up to full power for that final silky finish. The 64 oz container handles a double batch without complaint — which matters a lot when you’re feeding a crowd.
The self-cleaning function is worth mentioning too. After making queso, I just add warm water and a drop of dish soap, run it for 30 seconds, and rinse. Done. On a party prep day when I’m making three or four dips back to back, that speed matters enormously.
That said, if the