This post contains affiliate links. As an Amazon Associate, I earn from qualifying purchases at no extra cost to you.
The first time I made a coconut cream fruit dip dairy free version, I was honestly just winging it. My sister-in-law is severely lactose intolerant, and I’d promised to bring something sweet to her baby shower that she could actually eat. I had a can of coconut cream, a block of dairy-free cream cheese, and about 25 minutes before I needed to leave. What came out of that bowl stopped me in my tracks. It was silky, lightly sweet, and had this delicate tropical flavor that made every piece of fruit taste like it belonged somewhere with a beach view.
I brought it to the shower expecting to quietly set it next to the veggie tray. Instead, three people cornered me before the gift opening to ask for the recipe. My sister-in-law texted me the next morning saying she’d eaten the leftovers for breakfast. That was twelve years and probably 80-plus batches ago. This dip has been to tailgates, birthday parties, potlucks, and more holiday spreads than I can count. Every single time, the bowl comes back empty.
Here’s what I’ve learned from making it obsessively: the difference between a good coconut fruit dip and a transcendent one comes down to a few specific techniques. Get those right, and you have a party staple that works for nearly every dietary restriction without tasting like a compromise. Let me walk you through everything.
Why This Coconut Cream Fruit Dip Dairy Free Recipe Actually Works
- Coconut cream instead of coconut milk: Coconut cream has significantly less water content. That means you get a thick, luxurious base without any gumminess from added thickeners. Coconut milk will leave you with a runny dip that weeps onto the fruit platter. Trust me — I learned this the hard way at a neighborhood cookout, and the sad puddle of liquid under my fruit bowl still haunts me.
- Chilling the can overnight: Cold coconut cream separates naturally. The thick cream rises to the top, leaving the thin water behind. You scoop only the solid cream, which whips into a fluffy, mousse-like texture that holds its shape for hours. This one step is the biggest upgrade most home cooks skip.
- Powdered sugar over granulated: Granulated sugar stays gritty in a cold dip. Powdered sugar dissolves instantly and adds a subtle smooth body. It also contains a small amount of cornstarch, which gives the dip just enough structure to scoop cleanly.
- A pinch of salt and a squeeze of lime: Fat needs contrast. Without salt and acid, coconut cream dip tastes flat and one-dimensional. A small pinch of salt and just a teaspoon of fresh lime juice wakes everything up. Your guests won’t identify it as lime — they’ll just know the dip tastes surprisingly complex.
What You’ll Need
Prep Time: 10 minutes | Chill Time: 30 minutes minimum (overnight preferred) | Total Time: 40 minutes active + chill | Servings: 10–12 as a party dip
- 1 can (13.52 oz) organic unsweetened coconut cream, refrigerated overnight — see gear section for my preferred brand
- 4 oz dairy-free cream cheese (such as Violife or Kite Hill), softened to room temperature
- ¾ cup powdered sugar, sifted
- 1 teaspoon pure vanilla extract
- 1 teaspoon fresh lime juice (about half a small lime)
- ¼ teaspoon fine sea salt
- Optional: 1 tablespoon toasted shredded coconut for garnish
- Optional: ½ teaspoon lime zest stirred in for a more pronounced citrus note
Substitutions: No dairy-free cream cheese on hand? Use 3 tablespoons of softened regular cream cheese if dairy isn’t a concern. Swap lime for lemon if that’s what you have. For a lighter sweetness, reduce powdered sugar to ½ cup and add a drizzle of agave.
How to Make It: Step by Step
Step 1: Chill the Coconut Cream Can
Place your unopened can of coconut cream in the refrigerator at least 8 hours before you plan to make this dip. Overnight is ideal. Do not shake the can. When you open it the next day, you should see a thick, almost solid white layer sitting on top of a thin, watery liquid. Scoop only the thick white cream into your mixing bowl. Leave the liquid behind — you can save it for smoothies.
How to tell it’s right: The cream should hold its shape on a spoon and look almost like soft shortening. If your cream looks fully liquid, your refrigerator may not be cold enough, or the specific brand you used has added emulsifiers that prevent separation. In that case, proceed anyway — the dip will still work, but the texture will be slightly looser.
Common mistake: Trying to rush this by popping the can in the freezer. Freezing makes the cream icy and grainy. It won’t whip smoothly. Plan ahead and give it a full night in the fridge.
Step 2: Soften the Dairy-Free Cream Cheese
Pull your dairy-free cream cheese out of the refrigerator 30–45 minutes before you start. Cold cream cheese will not incorporate smoothly into the coconut cream. You’ll end up with stubborn lumps that no amount of mixing will fully eliminate. Room temperature cream cheese blends in seconds and creates a seamless, creamy base.
How to tell it’s ready: Press a finger gently into the block. It should leave an indentation easily without resistance. If it still feels firm and cold, give it another 15 minutes.
Common mistake: Microwaving to speed up softening. Even 10 seconds too long and the cream cheese melts unevenly. The resulting dip turns greasy. Room temperature, the slow way, is always worth it.
Step 3: Beat the Cream Cheese First
Using a hand mixer or stand mixer with the whisk attachment, beat the softened dairy-free cream cheese alone for about 60 seconds on medium speed. You want it completely smooth and slightly fluffy before anything else touches it. This pre-beating step breaks down the dense structure and makes incorporation much easier.
How to tell it’s right: It should look pale, smooth, and slightly increased in volume. No lumps. No streaks.
Step 4: Add the Coconut Cream and Whip Together
Add the chilled coconut cream to the beaten cream cheese. Start the mixer on low to combine, then increase to medium-high. Whip for 2–3 minutes until the mixture is fluffy, smooth, and slightly increased in volume. It should look like a thick whipped topping — not soupy, not stiff.
Common mistake: Over-whipping. In my experience, going past the 3-minute mark on high speed can cause the fat in coconut cream to separate slightly and turn grainy. Stop when it looks lush and pillowy.
Step 5: Add Sugar, Vanilla, Lime, and Salt
Add the sifted powdered sugar, vanilla extract, lime juice, and sea salt. Mix on low speed until just combined — about 30 seconds. Taste immediately. Adjust sweetness or acidity to your preference. The dip should taste bright, slightly tropical, and lightly sweet. Specifically, the lime should whisper, not shout.
Step 6: Chill Before Serving
Transfer the dip to your serving bowl or an airtight container. Refrigerate for at least 30 minutes before serving. This rest time allows the flavors to meld and the texture to firm up into the perfect scoopable consistency. Meanwhile, prep your fruit platter so everything is ready to go at once.
Preparation Tips From 100+ Batches
- Make it up to 48 hours ahead. This dip actually improves with time. The flavors deepen and the texture firms up beautifully. Store it covered in the refrigerator and give it a gentle stir before serving if any liquid separates on the surface.
- Scale up easily for crowds. For a large party of 25 or more, I double the recipe and use two 13.52 oz cans. Everything else doubles proportionally. That said, I beat the cream cheese for each batch separately rather than doubling in one bowl — it keeps the texture more consistent.
- Seasonal variations that have killed at parties: In fall, add ½ teaspoon cinnamon and swap vanilla for maple extract. Around the holidays, stir in a tablespoon of orange zest and a pinch of cardamom. For summer, fold in 2 tablespoons of finely mashed fresh mango with the lime juice.
- Storage: Keeps refrigerated for up to 4 days. Do not freeze — the texture becomes grainy and watery upon thawing, and no amount of re-whipping fully rescues it.
- Traveling with the dip: Transport it in a lidded jar or airtight container packed in a small cooler. Stir briefly after arriving and transfer to your serving bowl. It handles travel surprisingly well as long as it stays cold.
- If your dip turns out too thin: Refrigerate for an additional 30–60 minutes before panicking. Nine times out of ten, extra chill time fixes a loose texture completely.
What to Serve With This Coconut Cream Fruit Dip
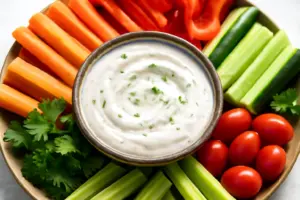
The classic approach is a rainbow fruit platter, and honestly, it earns that classic status for good reason. However, some fruits work dramatically better than others with this dip.
Best fruit dippers: Sliced fresh strawberries, pineapple chunks, mango spears, kiwi wedges, seedless red grapes, and halved fresh figs. The dip’s tropical base pairs especially well with anything acidic or bright.
Unexpected dippers that people go crazy for: Thin ginger snap cookies (the coconut-ginger combination is extraordinary), lightly salted plantain chips, Belgian waffle pieces, and cinnamon pita chips. For example, at my nephew’s graduation party last summer, the ginger snaps disappeared faster than the fruit.
What to avoid: Skip very watery fruits like watermelon — they release too much liquid and dilute the dip in the bowl. Also avoid bananas at room temperature; they brown quickly and the starchy texture competes with the dip rather than complementing it.
For a dessert spread: Serve alongside brownie bites, toasted pound cake cubes, and salted pretzel rods for a full sweet-and-salty dessert dipping station. This combination format works beautifully at bridal showers, baby showers, and holiday dessert tables.
The Gear and Ingredient That Makes This Dip Better
I’ve made this dip with a lot of different coconut creams over the years. The brand you choose matters more than most people realize. Specifically, the fat content and the absence of added emulsifiers and stabilizers directly affect whether your cream separates properly, whips cleanly, and tastes like real coconut rather than a vague tropical impression.
My current go-to is Roland Foods Organic Unsweetened Coconut Cream. This 13.52-ounce can is USDA certified organic, unsweetened, and — critically — free of the gums and emulsifiers that prevent proper separation. When I refrigerate this can overnight, I get a thick, solid cream layer that takes up nearly the full can. The flavor is genuinely coconut-forward: rich, clean, and slightly sweet on its own without any metallic or off-putting aftertaste.
Before I found it, I cycled through probably eight or nine different brands. Some separated poorly. Others had a faint soapy undertone from added stabilizers. A few left the dip with a grainy texture no matter how carefully I whipped them. Roland Foods solved every one of those problems. The single-can size is also perfect for one batch of this recipe without any waste.
On the other hand, if you’re making this on a tighter budget or want to try it before committing to a larger can, the Native Forest Organic Unsweetened Premium Coconut Cream in the 5.4 fl oz small cans is a solid runner-up. The smaller cans are convenient for testing the recipe or scaling it for just two to four people. The flavor is slightly lighter than Roland Foods, but it’s still organic, non-GMO, and reliable. For a smaller party or a quick weeknight dessert situation, two small cans will get you where you need to go.
As for equipment: a hand mixer is all you truly need. A stand mixer is great if you have one, but it’s absolutely not required. I made this dip with a hand